From Speech Impairment to Motivational Speaker: How I Create My Talking PowerPoint Presentations
People are often puzzled by how I can be a motivational speaker when I have such a pronounced speech impairment. A fair puzzlement, indeed.
My career choice is largely thanks to technology. Because of technology, I am able to convert text into synthesized speech, which I then embed into my PowerPoint presentation that also has scrolling captions and images.
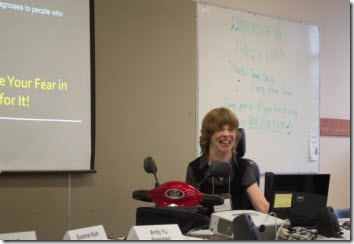
However, the process is not for the faint of heart or technophobe. For the technophile who likes an ingenious mashup, here is a behind-the-scene-look at how I created my most recent PowerPoint presentation “Go Beyond: Stare Your Fear in the Face and Go for It!â€
Writing and Editing
The process begins with writing my presentation in Microsoft Word. Typing with only my left thumb is slow; using the WordQ software for word prediction and completion saves me keystrokes.
However, when I am in my writing groove, I either keep typing and lose the benefit of having word prediction or I constantly look up at the word prediction box on my computer screen and lose the flow of words.
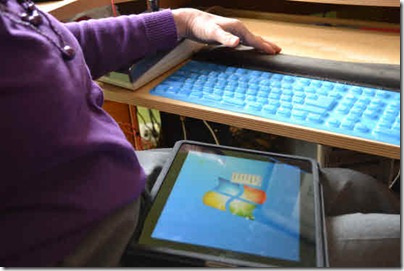
Here’s where using my original iPad with the free (yet no longer available) DisplayLink app as a second computer screen comes in handy. I drag the word prediction box over to the second screen and place the iPad on my lap, within the same view as my keyboard, which makes writing a little more comfortable.
Time: 20.75 hours
Chunking Text
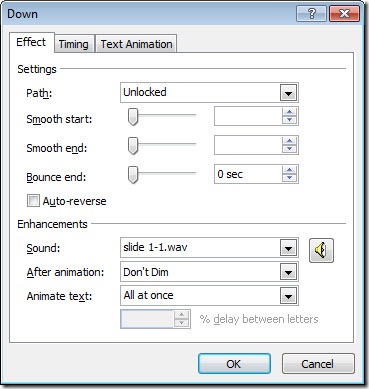
The scrolling captions, for the benefit of audience members who are hearing impaired, are actually text boxes stacked above each PowerPoint slide. Motion paths (the green and red arrows in the image below) move the captions down to along the top of the slide when I hit the Space Bar while presenting. Each slide has 15 captions; an arbitrary number that can easily be decreased on a slide, but not easily increased.
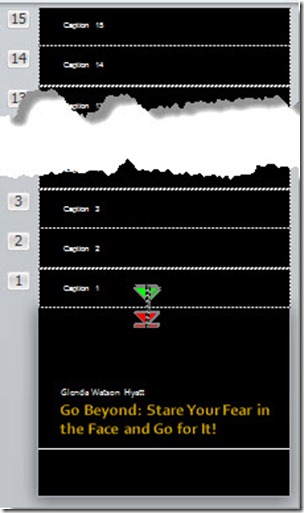
Each caption holds approximately a line and a half of text from Microsoft Word.
Once I have written my presentation, I break the text into slides and captions. Captions become identified by the format Slide X-Y – where X is the slide number and Y the caption number – which is important in later steps.
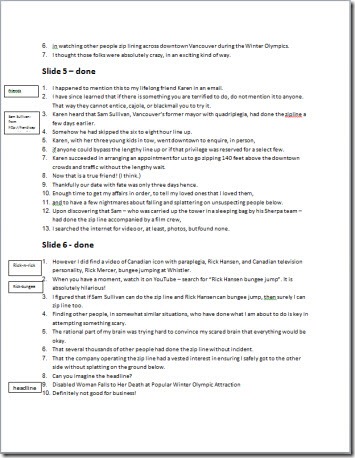
Some slides end up having less than 15 captions and some captions are short depending on natural breaks in the content and where I want slightly longer pauses. This is one of the few ways I can control the speed of delivery.
Time: 2.5 hours
Copying the Captions
At this point, my ever-patient husband Darrell copies the captions from Word and pastes into the corresponding the caption box in PowerPoint. He also saves each caption as a separate text file, using the structure Slide X-Y as the filename.
Time: 4.33 hours
Kate-izing the Text
Next comes converting the text into speech with the software TextAloud and the synthesized voice known as Kate. One by one, I open each text file and listen to how Kate reads it. Sometimes some tweaking of the pronunciation is necessary; for example, is “read†meant to be spoken as “reed†or “red†in that instance?
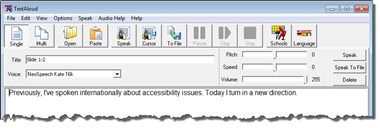
Once saving it as a WAV file (the only option compatible with PowerPoint), I link the audio file with the appropriate caption via the Animation Panel in PowerPoint. Here’s where the filename structure Slide X-Y comes in handy.
Time: 5.25 hours
Creating, Adding and Layering images
For the most part, I use my own images rather than stock ones in my presentations. Finding them and then cropping and adding arrows or such (as needed) takes time, albeit fun.
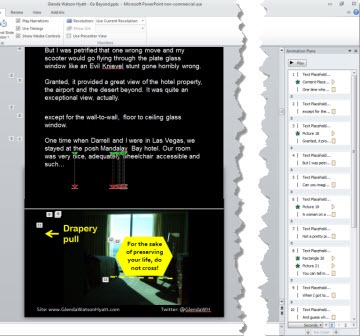
The tricky part is the layering of the images. The slide below has four images layered upon one another, plus text boxes and arrows to highlight details. All of these are inserted between the appearance of the captions via the Animation Pane on the right.
Getting the order and the timing right for all of these moving bits is when I reach for the chocolate; the darker, the better.
Time: 17.25 hours
Testing, Tweaking and Practicing
Now that the presentation is built, I can see how it looks and sounds as a whole. I make revisions, adjustments and corrections as needed. Changing one word means redoing the audio file, editing the caption and re-linking the audio file to the caption. It all takes time, but it is worth it in the end.
With this one presentation, I ran out of time before I was 100% happy with the end product. No one knew except me.
Time: 3 hours
After 53.08 hours, 16 slides, 163 audio files, 163 captions, 163 motion paths, 38 images and numerous arrows, text boxes and accessories, I have a 30 minute presentation. Whatever it takes to get the job done!
Here is a brief clip from “Go Beyond: Stare Your Fear in the Face and Go for It!â€:
(Transcript is available here.)
To have me share the entire presentation with your group, your organization or at your event, please contact me.
If you enjoyed this post, consider buying me a chai tea latte. Thanks kindly. Receive blog updates via
email
Receive blog updates via
email Subscribe via RSS


