WordPress vs Live Writer: The Image Smackdown
 In my blogging, I use both the blogging platform WordPress 2.7 and the offline editor Windows Live Writer 2009 for writing the posts. I have been amazed by how differently the two applications handle images. In fact, I have often wondered, usually late at night, which one is most accessible in terms of the images.
Today is the day to put the two applications in a byte-to-byte, no holds barred smackdown!
Round #1: Inserting an Image
The first step in inserting an image into a post is to identify the image.
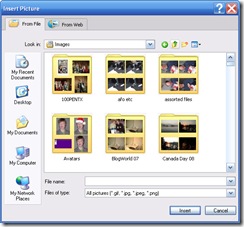
In the Live Writer corner: the keyboard shortcut Ctrl + L opens the “Insert Picture†dialog box to choose the image from either my computer or from the web.
In the WordPress corner: after some poking around, I found the keyboard shortcut Alt + Shift + M for inserting an image. This option is for an image that is already online.
If, however, the image needs to be uploaded, I must use the “Add an Image†button on the Upload/Insert toolbar:

After some more poking around and reading Using Images in Posts, I could not find a way to activate the “Add an Image†button using the keyboard. Even by tabbing, I couldn’t reach the button.
According to the Authoring Tool Accessibility Guidelines (ATAG) 2.0 – Working Draft, which applies to both WordPress and Live Writer, “Authors with a wide range of abilities must be able to operate the functions and components of the authoring tool user interface.†Unless I missed finding a way to access the “Add an Image†button using the keyboard, this function is not available to bloggers relying solely on the keyboard.
Round #2: Using the Interface
The next step in inserting images into a post is to set the positioning or alignment, and to enter the alternative text (alt) to benefit individuals using screen readers and to make it searchable by search engines.
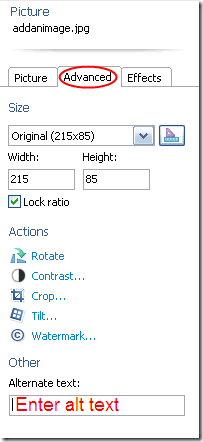 In the Live Writer corner: a straightforward interface in a sidebar for manipulating images. After poking around for at least half an hour, I could not find a way to get from the main Writer window to Picture side panel using the keyboard. That doesn’t mean a way doesn’t exist; I simply didn’t find it. Once in the side panel, the settings are operable via the keyboard. However, switching between the three tabs – Picture, Advanced, and Effects – using the keyboard also remains a mystery.
Under the Advanced tab, the alt text can be entered. Advanced? Alternative text is crucial to accessibility. One penalty point!
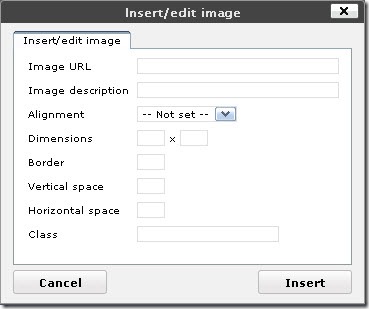
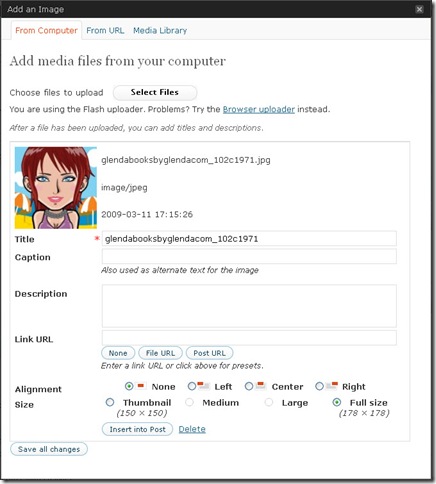
In the WordPress corner: the dialog box is not straightforward:
I am presented with four text boxes (or fields) without a clear understanding of what they are for. The Title box is marked with a red asterisk, likely indicating a required field; yet a note under the Caption box says “Also used as alternate text for the image. The Title is required, but the Caption is the alt? One penalty!
William Lawrence kindly explained the four fields in a comment on WordPress 2.7: A Brief Accessibility Review:
When inserting an image with WordPress all that is required is the Title which then gets used for the title and alt attribute of the image element. This is kind of good, because it kind of meets ATAG requirements, however because the content in the title and alt attributes are duplicated, this is inappropriate as it duplicates the context of the content. In addition, if one does not change the title of the image from an improper file name, the meaning is lost.
When one adds caption text, this additional text is placed next to the image and alt attribute of the image, while the title attribute of the image remains the title, or filename, of the image. This is kind of okay because now the image element no longer has duplicate content for these attribute, however the alternative text for the image now repeats what duplicated in the content of the article: inappropriate and repetitive.
Meanwhile, the description text is used as content for Attachment post page if one chooses to publish each image as a separate attachment post. More information can be found on their Codex for Using Image and File Attachments.
I need a flow chart to follow that! Another penalty.
Tip for bloggers: Because these two applications and many others do use the filename for the default alt text, make the filename more descriptive (and use a hyphen or underscore between words) when originally saving the image on your computer. This may not be the ideal alt, but it might prompt you to then revise the text when inserting the image.
Round #3: Validating the Code
Besides being accessible to me – the blogger, the application must also output content that is accessible to the blog readers. One way of measuring the content’s accessibility is to see whether the published code validates using a tool such as the W3C Markup Validation Service.
In the Live Writer corner: the published code –
<img title="Glenda’s avatar" style="border-right: 0px; border-top: 0px; display: inline; margin-left: 0px; border-left: 0px; margin-right: 0px; border-bottom: 0px" height="178" alt="Glenda’s avatar" src="http://www.doitmyselfblog.com/wp-content/uploads/2009/02/glendabooksbyglendacom_ 102c1971.jpg" width="178" align="left" border="0" />
– validates with no errors!
In the WordPress corner: the published code –
<div id="attachment_559" class="wp-caption alignleft" style="width: 188px"><img class="size-full wp-image-559" title="Glenda’s avatar" src="http://www.doitmyselfblog.com/wp-content/uploads/2009/02/glendabooksbyglendacom_ 102c1971.jpg" alt="Cute chick!" width="178" height="178" /><p class="wp-caption-text">Cute chick!</p></div>
– validates with no errors!
Frankly, I am surprised by this round’s results. This round was the one that had me wondering late at night. I thought the deprecated elements (code no longer used) and the repetitiveness of the title (in Live Writer) and the Caption (in WordPress) would have been marked as errors.
Bonus Round: Additional features
Although not directly related to accessibility, having extras for manipulating images are quite handy. It saves having yet another application open and switching between the two. 
In the Live Writer corner: a variety of borders and actions (i.e. rotate, crop and watermark) that can be applied to images to add interest.
In the WordPress corner: zilch! WordPress is down. Its a knockout!
In terms of the accessibility of using images in posts, the winner is…Windows Live Writer!
If you enjoyed this post, consider buying me a chai tea latte. Thanks kindly.
 Subscribe via RSS


